With so much bird watching going on with Charlie this summer, the first part of this year's Christmas ornaments just had to be birds! These are three in Christmas colors, same pattern, different embellishments.
Materials:
*green, white, yellow, and red felt
*green, white, red, and black embroidery floss or perle embroidery cotton
*6 large red beads
*2 large clear, silver lined beads
*small yellow silver lined beads
*small clear silver lined beads
*green, white, and red 1/8 in satin or grosgrain ribbon
*pattern found here
Cut two bird pieces and two wing pieces each from the green, white, and red felt.
Holly Bird:
Cut two holly leaves from green felt and free hand six small circles from red felt. Sew a holly leaf to each white wing with a blanket stitch and a running stitch down the center. Attach the berries with one stitch in the middle. Make sure you have each wing pointing the correct way on each side!
Attach wings to each side of the red bird shapes with a blanket stitch. Sew one large red bead onto each holly berry. Make a french knot eye on each side of the bird.
Attach the two bird sides together using a blanket stitch and inserting a looped 12 inch piece of ribbon on the top.
Snowflake Bird
Attach a red wing to each side of the white bird shapes. Embroider a simple snowflake on each side and add a few french knots.
Add a small clear silver lined bead to the end of each snowflake point and sew a large clear silver lined bead in center of each snowflake. Add a french knot eye to each side. Sew the two sides together as above.
Star Bird
Cut out two yellow stars and sew one to each green wing using a running stitch.
Attach wings to the each green bird shape. Add a french knot eye to each side.
Sew yellow silver lined beads in a cluster in the center of each star. Attach the two bird sides together as above.
Happy Creating! Deborah
One of the things I love is working on Christmas projects during the summer! The new fabrics come out, the Christmas crush hasn't begun yet, and there just seems to be so much time to get all those projects I have planned finished. Come November I start triaging which ones will have to wait for next year .... but in July, everything seems possible. This week, I'll show you some of what I've been working on.
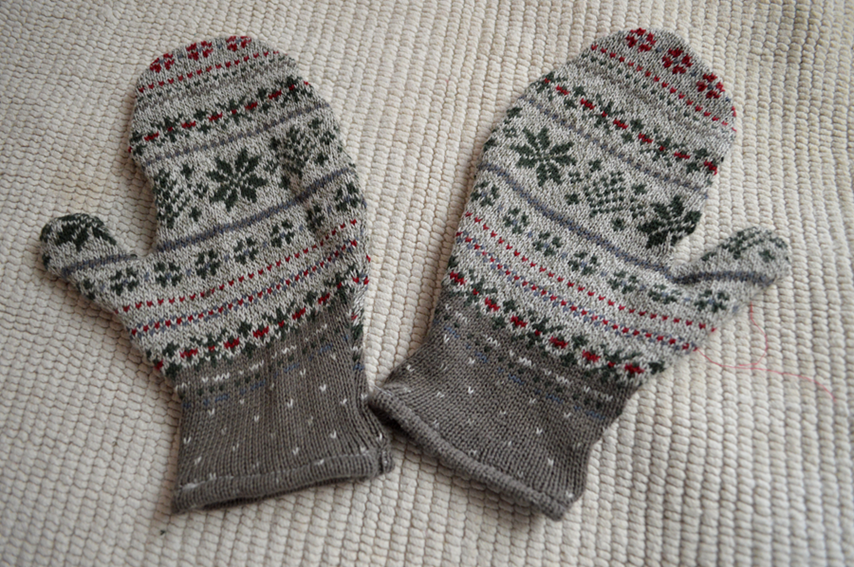
I found this Christmasy sweater at Goodwill last spring. At first I thought it would become a Christmas scarf, but I couldn't quite configure it right - so the arms have become mittens and I still have the body to make something else with!
First, I cut close to the arm seam and then along the shoulder seam to remove the arms.
To make a pattern, I laid my hand on a piece of paper and traced around it. I don't like tight mittens, so I gave my fingers lots of room. Be careful not to make the wrist too narrow or you'll have trouble getting your hand into the mitten.
I added 1/4 inch around the outside of my line, cut the pattern out, and placed it on a doubled over arm. I had originally planned to use the sleeve's hem as the bottom of my mitten (the best way to go so you don't have to hem it), but that left out too much of the Christmas pattern, so I added a 1/2 inch to the bottom by placing a pin where I wanted to cut.
For the second mitten, I wanted to match where pattern was with the first mitten, so I laid the first mitten on the doubled over second arm and cut out the second mitten.
I hemmed the mittens before I sewed them together by folding the bottom under 1/4 inch and then folding that over another 1/4 inch. I didn't want to stretch the fabric as I sewed and it's tough for my machine to get sewing on thick pieces, so I began hemming about 1/2 inch in from the edge. I then turned the mitten around and sewed that 1/2 inch, overlapping a little with the hem that was already done.

I pinned the right sides of two mitten pieces together. Like with the hemming, I didn't want to pull the fabric (it makes it wonky) to get started on the thicker hem, so I began sewing half way on the mitten. I then turned it over and overlapping a bit on the previous sewing, I sewed the rest of the mitten. You'll want to experiment with what type of stitch you use to sew the mittens together. Sewing machines usually have several edge binding stitches - depending on the thickness of the sweater you're using, some will work better than others. Or you can simply use a zigzag stitch! I used scrap pieces of sweater to experiment.
Turn right side out and you have one mitten done! Repeat for the second one.
Happy Creating! Deborah
Some inspiring different takes on the Ohio Star pattern!
Sally Schneider created this gorgeous quilt combining the Ohio Star and Courthouse Steps patterns using bags of scrap fabric. Read about her strategies for how to put unrelated scraps together here.
The pattern for this color wheel study quilt is on Della Jane's Cloth and Patterns - this looks like a site for vintage patterns, so there may only be one available. Looking at this has reawakened my desire to make a color study quilt!
Shelley on Rebel Homemaker designed and quilted this gorgeous combination of Ohio Stars and squares. Read about its creation here.
I love the way this quilt from Busy Bee No. 16 combines different sizes of Ohio Stars! And the way some are set in straight and some on an angle. See more about it here.
Happy Creating! Deborah
I'm working on a new to me quilt block, the Ohio Star. This pattern has been around since at least the early 1800's and is another of the quilt blocks that is great for using up scraps of fabric. I'm not using scraps though! I just got a new fat quarter pack of Winter Northwoods Artisan Batiks from Robert Kaufman from here.
But before I get on to the star tutorial .... remember the kitten rescue escapade last spring? (From here and here) Well, the kittens live in the house with us now and are getting bigger and sassier every day! We think they're about 12 weeks old and they're about to be introduced to our older cat, Raven. Poor Raven - she's had glimpses of them and has done the requisite hissing. Tiger is the smaller one. He's feisty and the bravest of the two, the first one to explore new areas of the house and to investigate new toys.
Felix is more thoughtful. He lets Tiger barge in first and then follows if Tiger looks okay! Such a sweetie.
Okay - on to the Ohio Star!
To make the quilt block at the top of this blog, I'm going to refer to the fabric as the dark fabric and the light fabric. It's been working better for me to make the star square pieces larger than I want it to be and then trimming them down, so I'll show you how I do that. I want to end up with a 9 inch finished size block (9.5 inches with the 1/4 inch seam allowances). I cut 2 pieces of dark and 2 pieces of light that were 4.5 inch squares. This is the 3 inch finished size of the star squares plus 1.5 inches. Then I cut 1 piece light fabric and 4 pieces of dark fabric that were 3.5 inch squares. These will be solid pieces and are the 3 inch finished size plus 1/4 inch on each side as a seam allowance.
Take one light and one dark 4.5 inch square and put the light square on top of the dark one, matching the edges.
Draw a line from one point to the opposite point on the light square.
Sew 1/4 inch on each side of the pencil line and then cut along it to get two halves.
Repeat with the other two 4.5 inch light and dark fabric. Iron open all the squares - I pressed the seam toward the dark side.
On the wrong side of two of the squares, draw a line from the point of the light fabric to the point of the dark fabric, across the seam.
Place one of the squares you've just drawn the line on on top of one of the other squares - put right sides together, make sure the dark side of the fabric matches up with the light side of the top square, and match the seams.
Sew 1/4 inch on each side of the line and cut in half along the line.
Repeat with the last two pieces and press all four squares open.
To trim the squares, you need to find the center of the square. Since we want these squares to be 3.5 inches, the center will be at 1.75 inches. Put the 1.75 inch mark in the center of the square and trim the right edge. Rotate and repeat with all edges.
Repeat with all the squares.
To make the large quilt block, you'll be putting the 3.5 inch squares together into strips as below. Attach two solid dark squares to one of the star squares - make sure that the light fabric forms an hourglass. Make two of these strips. For the center strip, attach two star squares to the solid light square - make sure that the light fabric forms an hourglass on its side this time.
Sew together (making sure to match the seams) press open, and you have your first block done!
I'm busy putting more of these together and will show you what I'm up to soon!
Happy Creating! Deborah
Here are some summer inspirations!
Around here, July means the Queen Anne's Lace and Fireweed are both in full bloom. I'm in love with this gorgeous embroidery by Jo Van Kampen that really captures the delicateness of Queen Anne's Lace. And the beads add great texture!
Hoffman released a beautiful Fireweed fabric a couple of years ago - a quick Google search shows it's still available in a few internet stores. I really like the depth it has!
And these two summer themed quilts are fun! The watermelon quilt is on Jane Allen Quevedo's blog - what a good way to use up red and green scraps. A Day At The Beach, by Cindy Grisdela can be seen here. It has great free motion quilting!
Happy Creating! Deborah
Mmmm .... I love this part of summer! Warm days, cool nights - and raspberries! We picked a flat and a half today, just in time as our last batch of raspberries is gone except for one last piece of spongecake with raspberries and cream cheese frosting.
Tomorrow will be filled with jam making!
And maybe some raspberries that will last .... I'm thinking of beaded raspberries (instructions here)
or maybe some embroidered raspberries canes based on the blackberries from a past post.
Happy Creating! Deborah