This week we're going to transfer a simple design to a silk scarf, outline the design with gutta, fill in the shapes, and learn how to fill in the background. You can use my sheep design, draw your own, or use one you find. Coloring pages and stained glass designs work real well - just Google what you want and you'll most likely come up with tons! (Example - "cat coloring page") This is the fourth in a silk painting series - see Lesson One for basic information and Lessons Two and Three to catch up on the skills we've been learning.
Materials:
*silk scarf - washed and ironed
*clear and black water based gutta
*Seta Silk Paint - I used yellow, green, red, turquoise, gray, chestnut, caramel, and black
*rubbing or isopropyl alcohol
*a few cotton swabs
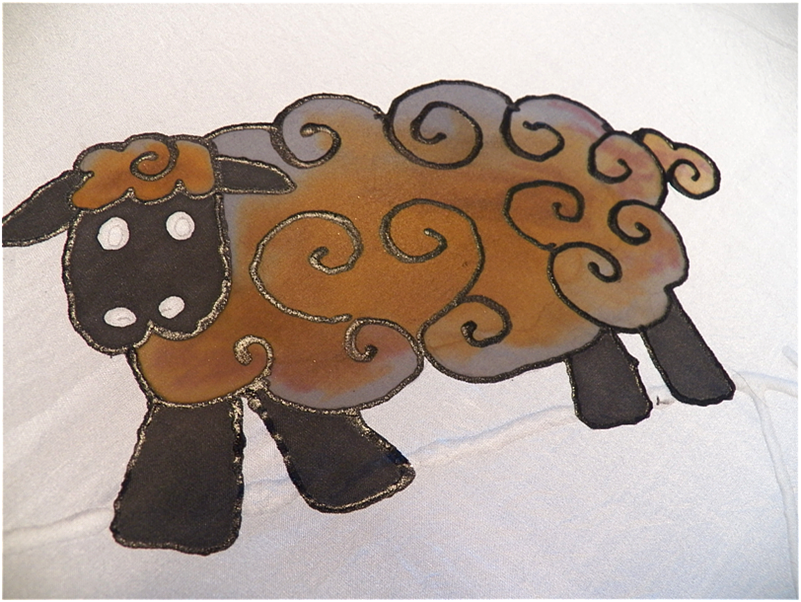
*simple design - my sheep design is here
alternate Word document design is here
1. Print off your design. You want something with simple lines with no lines close to each other.
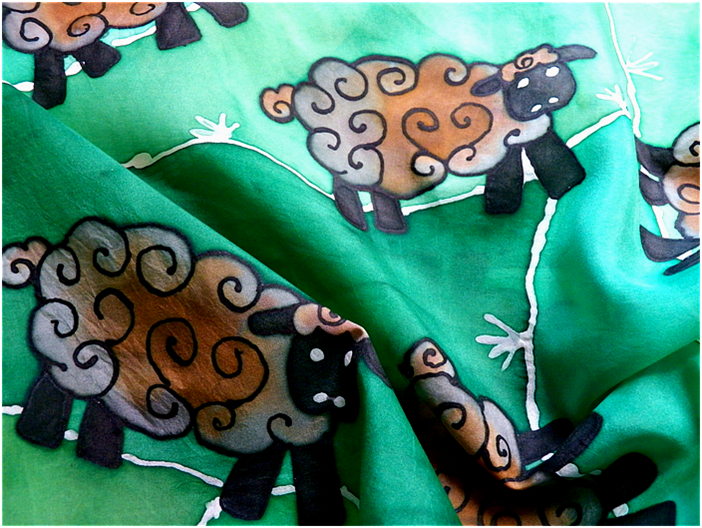
2. Lay your scarf over the first design. I wanted my sheep to look like they were tumbling around the meadow, so I just randomly placed them around the scarf.
Using a soft pencil, lightly trace the lines. You can either hold the scarf in place with tape or place something heavy (like a filled water bottle) at the top of the space you're working on.
3. Stretch the scarf onto a frame.
4. Go over all the sheep outlines and inner curls with black gutta. When I opened a new tube of black gutta to outline this, I discovered the applicator tube now has a hole already in it (it probably happened a long time ago - I haven't silk painted in awhile). Check and see if yours does and if so, don't cut the tip off. You'll only get a wider applicator hole and for this project, fine lines are best.
While you're going over the lines, pay careful attention to connecting each line together so that when you paint, the paint will not pass the gutta lines. Don't worry about the curls inside connecting.
Use clear gutta to put in the eyes and nostrils.
5. We're going to divide our backgrounds up into smaller, more manageable sections. You'll soon discover why! I put each sheep on a little hill and added a couple tufts of grass, using clear gutta.
6. Continue doing this until all sheep are on hills and all hill lines connect to each other or the edge of the scarf. Let everything completely dry.
7. If you accidentally drip clear gutta somewhere you don't want it to be, wipe off and sponge the area with a wet cloth. If you accidentally drip black gutta, work it into your design! It's there for good.
8. When your gutta is dry, hold your frame up to a bright light and look for tiny gaps in the lines and any lines that are somewhat transparent. The little teeniest break in the gutta will allow paint to leak out, so go over any lines you're not sure of.
When your gutta fixes are completely dry, you're ready to paint. Before starting, pour a little alcohol into a cup, grab a couple of cotton swabs, and put it in an easy to reach place. If you missed any tiny gaps in your gutta and a color starts leaking out, you can immediately swab a little alcohol around the leak and it should stop it.
9. First paint all the ears, faces, and legs with black. I like to squeeze a little of each color into its own plastic cup. I used a medium watercolor brush and first painted around the edges with gray. I then added caramel to the middle and scrubbed the edges a bit to blend them. Lastly, I added a tiny bit of chestnut to the caramel and scrubbed it around. Be gentle with the scrubbing - water based gutta can be scrubbed off. Work quickly to avoid color lines!
You might be tempted to first wash the entire sheep with water so the colors might blend together more easily - especially if you're used to watercolors or have used silk dyes before. Don't! The water will loosen the gutta and you'll have major leaks!
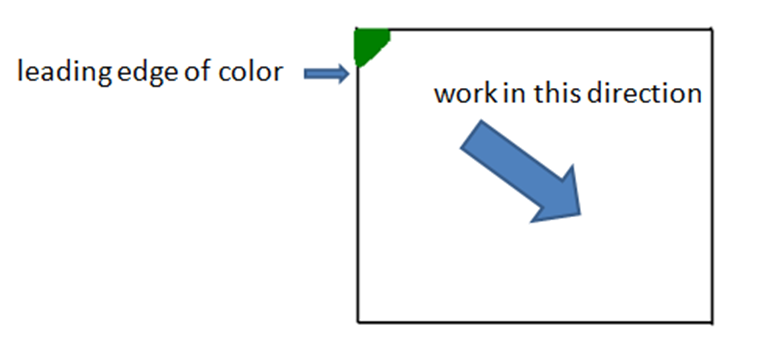
10. Let the sheep dry and then move onto the background. Backgrounds have to be filled in very quickly - the front edge of your paint will dry fast and leave a color line. So the goal is to keep working that front edge while filling in the space. We divided our space so we'll have a little breathing time!
Mix up four or five different greens. I used green, turquoise, and yellow in my colors. You can tone down any greens that are too bright by adding a drop or two of red.
Grab your largest brush and begin with your smallest section. Start at the thinnest edge or at a corner and work fast. Swipe your brush in the corner, reload with paint and swipe it across the leading edge. Repeat until the section is filled. You might get some color lines until you get the hang of this - don't worry, grass has lines in it! And even if you're really speedy, you'll likely get color variations. That's one of the downsides of using silk paints and water based gutta - but if you build that into your design, they work great. If we were using dyes and regular gutta, we'd be wetting down the silk first to give us longer to keep that front edge of color from drying, but if we did that now we'd get major breaks in the gutta and big time leaks.
11. Continue with each section until finished.
12. If you do get a small leak of green into a sheep, there's a fix.
Put a small amount of one of the darker colors on your brush and cover the green. Rinse your brush, but leave some water in it. Lightly scrub the edges to blend the colors - I found it helpful to also "paint" the sheep with a little plain water.
13. Let dry and iron to heat set the paint. Wait a day or two before washing. Update: You can wash your scarf after heat setting. See comments below for Pebeo's reply to a reader's question.
Next week, we'll paint a scarf using some silk painting special effects.
Happy Creating! Deborah
Lately, my net surfing has led me to some interesting and inspiring pieces of vintage embroidery. Here are some that especially caught my eye.
When looking at this dress, it's hard to remember that it is hand embroidered and smocked. In this day of machine worked fabric, it takes a bit for this to sink in! This is for sale on DressingVintage - which says it was bought in 1929 for the owner's honeymoon. I love this!
Can you imagine the hours of work that went into this French linen skirt from the 1790's? It would have been worn under a jacket. You can see more details on the Vintage Textiles website.
I've had a love/hate relationship with French knots since I first learned embroidery as a teenager! I loved the way they looked, but the knots always eventually fell apart. Usually sooner than later. I'm currently in a good relationship with them and can definitely see this wisteria pattern in my future. This 1920's cushion is for sale on Etsy here.
I've always had a fascination for Victorian era crazy quilts. This one from the late 1800's has a gorgeous fan design! I've been thinking about starting a Christmas themed crazy quilt - it'd be fun to work in a snowflake background with this type of design. This quilt and several others can be seen at the University of Wisconsin's Design Gallery site.
Happy Creating! Deborah
I used to keep a bowl of candy conversation hearts on the table for the few weeks leading up to Valentine's Day, but with the food changes I've had in the past couple years, that's a tradition I've let go. Instead, this year I have some embroidered felt hearts!
These are great for practicing embroidery stitches you're learning or expanding your embroidery repertoire. There are quite a few internet sites that are good sources for learning new stitches. One of my favorites is Sharon B's Dictionary of Stitches. I also like to carry a book of embroidery stitches when I don't have access to the internet. There are quite a few - I have the DK Stitch Sampler by Lucinda Ganderton.
Materials:
*felt
*embroidery thread
*fiber fill
*pattern found here
1. Cut two hearts from each of the colors you want to use. Embroider phrases from candy conversation hearts and designs.
2. Pin together, add a border stitch that sews the two hearts together, adding fiberfill before closing. Here are the four hearts I've made so far and the stitches I used.
Bullion knot roses, stem stitch for the words, lazy daisy leaves, cross stitch, and a running stitch to attach the two hearts.
Lazy daisy petals and leaves, French knots, stem stitch letters, and a running stitch to attach the two hearts.
Lazy daisy clover petals and leaves, stem stitch words, wings, and legs/antennae, satin stitch bee, running stitch in the wings, and cable chain to sew the two hearts together.
Lazy daisy petals and leaves, French knots, and blanket stitch to sew the two hearts together.
I sat little c down with a tapestry needle, embroidery thread (doubled and knotted so it wouldn't keep coming off the needle), and a felt heart for her first sewing lesson - not bad for a newly turned two-year-old!
Happy Creating! Deborah
If you're back for Class 3, you may be bitten by the silk painting bug! There's just something a bit addictive about it. Plus, you get to work with silk!
This week we'll be working with using a brush and getting used to mixing silk paint colors. If you're new to this series, see Class 1 for the materials you'll need. And everyone should review Class 2 as a reminder of the techniques we're using.
For this scarf, you'll need a prewashed scarf (air dried and ironed), clear gutta, and one of the following groups of your silk paint colors - either raspberry, hermes red, tangerine, and primary yellow OR hermes red, gitane blue, iris violet and turquoise OR gitane blue, turquoise, primary yellow and oriental green.
Stretch your scarf on the frame. Using the clear gutta, draw lines horizontally and vertically on the scarf, dividing it up into small squares. Don't worry about having wavy lines or squares that are different sizes. They'll still look great! Just concentrate on learning control of the applicator.
Pick one of your colors. Using full strength paint, color in random squares all over your scarf. To paint, let your brush soak up the paint, lay your brush onto the surface of the silk, and let the silk draw the paint out. It'll probably move to the gutta and stop, but if it doesn't quite reach, touch your brush tip to the white area and let the paint be pulled out.
Continue with the other three colors - but don't fill the whole scarf up! You're probably going to experience breaks in the gutta that cause one color to leak into the square next to it. Don't worry about it for this project - just look at why it happened so you can work at getting the gutta on without breaks. We'll look at this more next week.
Now, we'll start color mixing. I use small plastic cups I get at a restaurant supply store - anything that doesn't soak up liquid will work. Mix a small amount of two of the paints together and apply them to the scarf. Continue doing this with different combinations of paint - move on to mixing three colors together.
Let dry completely, wash to remove the gutta (see Class 2), air dry and iron.
I just love sunlight shining through silk!
Next week we'll be working on a scarf that uses a design we'll transfer onto the silk.
Happy Creating! Deborah
It's hard to imagine that I'll ever find myself in Lebanon (the country, not the various US towns), but if I do I'll definitely be visiting The Silk Museum located in Bsous in an old silk factory. Just browsing through their website is lots of fun and very informative. Most of what I know about the history of silk is from the Asia region, but silk also has a long history in other parts of the world, such as the Middle East.
The museum site has photos of past exhibitions, so be sure to take a look. Some highlights:
This richly embroidered piece from last year's Gold and Silk Exhibition of Caucasian and Ottoman Embroideries.
This gorgeous rug must have such a history to tell. It's from 2004's exhibit, An Orient of Silk and Gold - The Treasures of the Antaki Family.
I'm amazed by this intricate embroidery and would love to see it in person. It was part of the 2001 workshop, Ainsi-Soie-t-elle.
Happy Creating! Deborah
I found this darling vintage embroidery pattern of a kitten on French Knots and wanted to embroider it onto a shirt for little c. She's crazy, crazy about cats! The crazy cat lady of the two-year-old bunch! I had a leftover short sleeved shirt from a bunch I bought last summer to dye up for her, but the weather's too cold for short sleeves in the Northwest this time of the year, so I decided to add sleeves under the short sleeves. This is really easy to do if you have an extra T-shirt laying around. I had a really nice soft one I loved - until I accidentally put it in the dryer and got a midriff shirt. Not very attractive at my age!
Before adding the sleeves, I dyed the shirt (about one part Procion magenta with a smidge of cobalt blue and 1/2 part pewter) and did the embroidery.
1. Take the T-shirt you're going to add sleeves to and lay it out along the edge of a newspaper section that has a fold in it as shown below. Put the top of the sleeve directly on the fold.
2. Using a straight edge, draw a line from the armpit to the length you want the long sleeve to be. Notice how I'm following the taper of the sleeve so that the wrist will be a little narrower than the shoulder.
3. Make a mark on the newspaper's folded edge at the shoulder seam.
4. Fold the sleeve under and draw a line along the curved sleeve seam. There are dressmaker tools that can help you do this - if you have one, you can use that. Don't worry if you don't - you get close enough this way.
5. Draw a line 1/4 inch beyond the lines you already have - this is your seam allowance. You won't need an allowance at the wrist since we'll be using the bottom hem of the extra T-shirt.
6. Open up your newspaper pattern and place on the extra shirt, placing the wrist along the bottom hem. Make sure you have the bottom hems lined up evenly. Pin and cut out - you should have two sleeves.
7. Take one sleeve, fold in half (right sides together) and sew in a 1/4 inch seam.
8. Turn right side out. Fold the sleeve in half and mark the side that doesn't have the seam where shown. This is where you'll place the sleeve on the shoulder seam of the T-shirt you're adding sleeves to.
9. Slide the long sleeve into the short sleeve.
10. Find the seam inside the shirt where the short sleeve was attached to the shirt. Pin your long sleeve to this seam matching the mark you made to the shoulder seam and matching the underarm seams.
11. Finish pinning along the whole seam.
12. Sew along the seam line that was used to attach the short sleeve. I use a straight stitch and then go over it with a wide zigzag (too narrow and it makes the seam rough), but you might have a machine stitch you like to use to sewing and overcasting.
13. There's your first long sleeve!
14. Repeat with the other sleeve.
Happy Creating! Deborah


